
Wide players in FM19: How to harness them in your ball-hogging side

Like watching your wingers and wide players bomb up and down the touchline, getting crosses in? Or your full-back beguiling the entire opposition, manoeuvring his way into the box unmarked? Well stop reading right here. Wide players in FM19.
We’re looking for passing and moving, people. No player can move without passing first.
That’s how I developed this spectacular tactical system
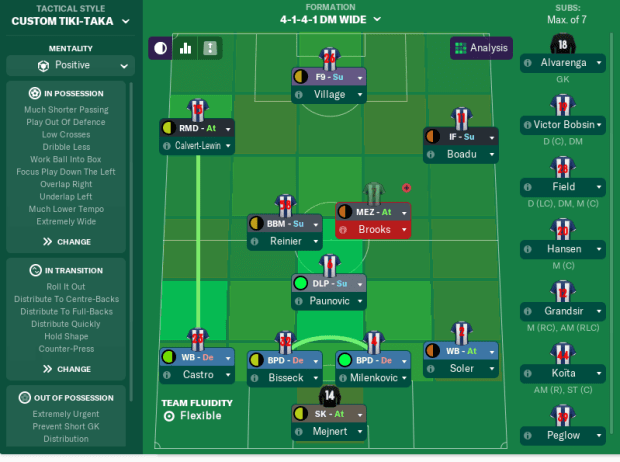
My tactic with wide players
Did you think any of that was true? It couldn’t have been further.
If you’ve seen any of my past pieces, the tactics were very different. They usually involved the same few roles permeating the team. What changed?
I realised how to utilise switches of play from one side to the other. Whenever my midfield’s crowded out, I will have Soler racing forward to provide width on the overlap. I also have Brooks ready to run into whatever free space there is. And when either of them create any space, Calvert-Lewin could be a tap-in away on the other side.
In truth, I used to have the misconception that possession-orientated games are predominantly conducted through the centre of the park. This was contradicted by some key statistics last season, courtesy of Whoscored:
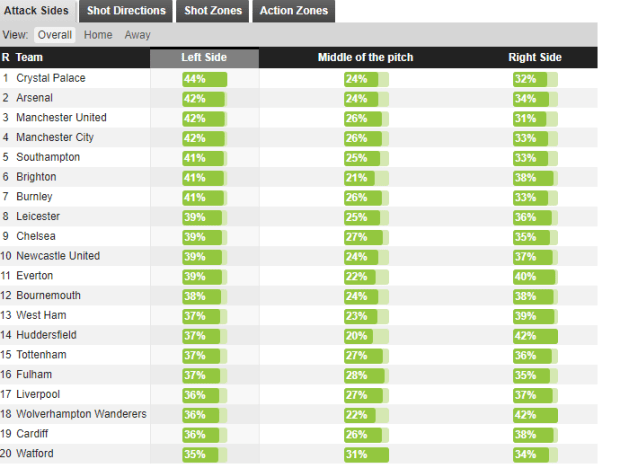
Manchester City, the tika-taka kingpins, attacked more down both sides than through the middle. Most of their attacks were built down the left. That’s despite Zinchenko, Delph, or whoever’s playing at left-back, generally tucking inside to allow Kyle Walker to bomb forward on the other flank. The most adventurous midfielder, Bernardo Silva, typically operates on the right of Man City’s midfield three.
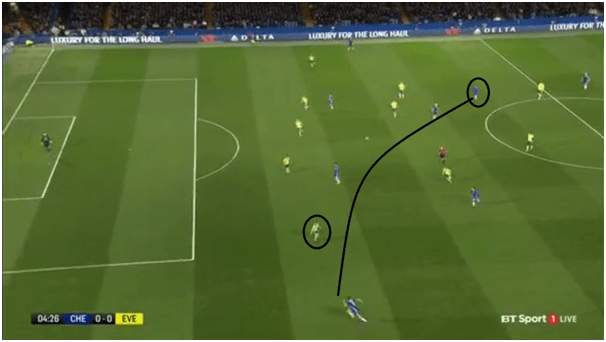
These statistics made me think that the most understated aspect of Man City’s play is how they build up on one side and whenever they sense an opportunity, spring the ball over to the other side, giving the wide player extra space and leaving the opposition on their knees. They’re just left hoping and praying for the best at that point.
How to utilise these switches of play with wide players
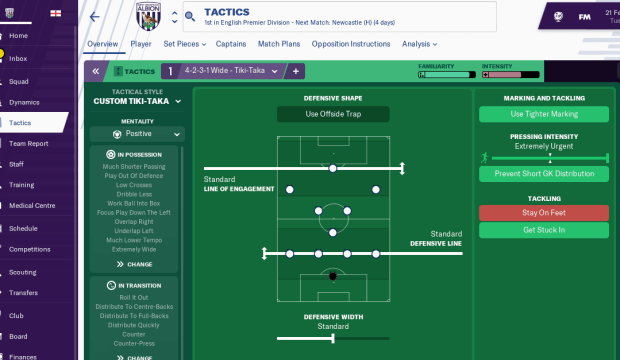
What’s important is balance. As you can see from my tactic, Castro has a defensive duty on the left side, while Soler has an attacking duty on the right. Castro’s set to sit narrower; Soler’s set to stay wider:
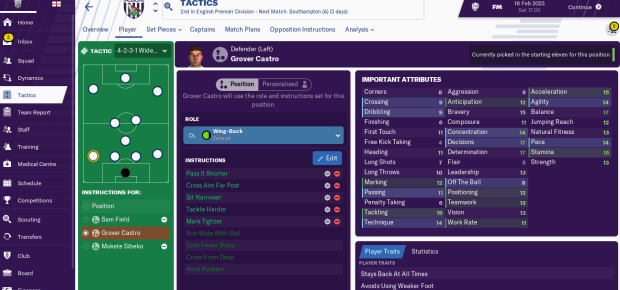
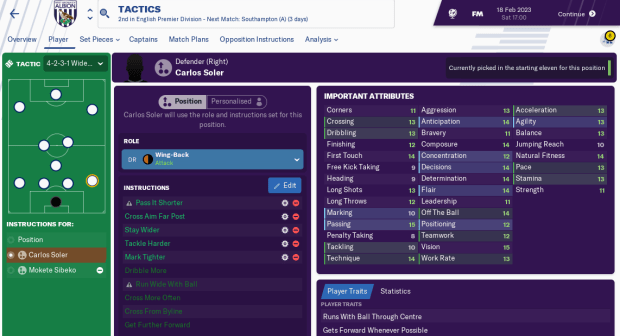
Castro tucking in has made him an easier passing option for my centre-backs and midfield. Furthermore, in the middle of the pitch, he has more passing options; switching play to the right is now easier for him. In addition, as a defensive wing-back, he’ll still try to get forward and perform the duties of a winger; he’ll just do that more cautiously. He will support Calvert-Lewin, the Raumdeuter. That’s crucial: our first choice goalscoring strategy is getting the ball to that man.
He also has support in my box-to-box midfielder, Reinier. I sometimes struggle to work out the difference between them and roaming playmakers. While they both start deep and roam forward, am I right in thinking that box-to-box midfielders:
- Aren’t playmakers in the sense that they predominantly use their physicality and dynamism to drive the team forward, but don’t try as many risky passes? They also hog the ball less, as I understand it?
- Are more handy in harassing the opposition midfield out of possession?
Midfield combinations with wide players
In a midfield three, it’s ideal to have a sitter, a supporter and a shuttler. The sitter holds their position, hogs the ball and dictates play from deep. The supporter roams between lines of midfield, supports the high press, and ultimately connects the dots between the sitting players and those who shuttle forward. The shuttler breaks free from any shackles and predominantly makes his contribution in the final third. These three jobs should all complement each other, if executed properly in the right system.
For the sitter, a deep-lying playmaker or regista could work. Possibly even a roaming playmaker if you’re comfortable taking risks; they pick up the ball from deep areas and, unlike box-to-box midfielders, won’t abandon their positions to harass the opposition midfield out of possession. For the supporter, there are a lot of roles to choose from. CM-S, box-to-box midfielder, roaming playmaker, ball-winning midfielder and carrilero are all suitable roles.
In this system, I’d be wary with the latter two, though. Our tackling and pressing is already set to be aggressive, and I’d be worried about my ball-winning midfielder being sent off every third game. Also, from my understanding, a carillero would drift wider than I’d like for this system. We want easy possession down the left side, before shifting the ball over to the right!
For the shuttler, in theory, any attacking role will do. This could be a mezzala, CM, or advanced playmaker. However, you must adapt these combinations to the system at hand. If you’re stuck, ask yourself: what’s our formation? Once that’s done, picture your routes to scoring and keeping goals out. If you’re still stuck, try some of these combinations out to see what works and what doesn’t!
Attacking combinations with wide players
Further forward, I’ve previously made the mistake of picking a false nine while setting my side up to play a vertical attacking game. For example, imagine you have ‘play through the middle’ as a team instruction. Your wide attackers will be behind the false nine. Surely your team will just end up hitting hopeful balls ahead of him? Naturally, they’ll bounce straight into the path of the opposition backs, for them to gobble up.
False nines behave like the playmakers you expect them to be when they have runners ahead of them. The easiest way to accommodate that is using the full width of the pitch and encouraging the wide players to bomb forward!
The inside forward works counter-intuitively in this system, to some extent.
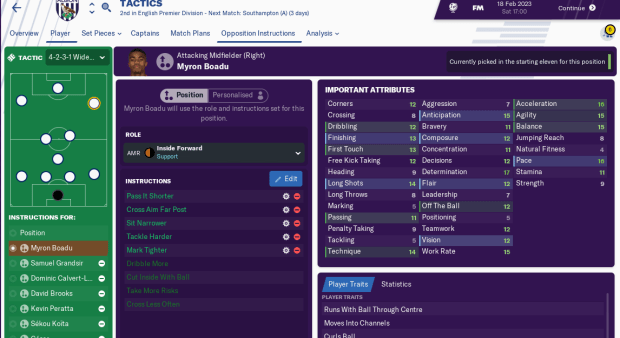
He sits narrower. However, he still provides width on the right side. You see, an inside forward naturally has a wide starting position, before coming inside. Telling them to sit narrower makes them more inclined to do so, but only when someone else is covering their position.
When the attacking wing-back blitzes forward, the inside forward will sit narrower. You might be thinking: what about the mezzala? You’d be right, except that they predominantly run wide when they have the ball. Even when the team are in possession, while the mezzala does drift wide into half-spaces, he doesn’t take up the role of a winger.
Using the inside forward
Anyway, enough semantics. What’s my inside forward actually useful for?
To start with, he’s useful for crossing, in tandem with my wing-back. Because we’re a less direct side that aim to keep the ball, getting the ball to our primary goalscorer often involves two shifts from side to side. Possession starts on the left; the ball then dribbles its way to the right, where our adventurous full-backs and playmakers hopefully have space to create, before they make use of that space and release Calvert-Lewin.
Supporting inside forwards are generally playmakers. They sit behind the striker, regardless of the striker’s role, and create confusion for opposing defenders by running inside into acres of space. The false nine has a similar role in this system. Lastly, the inside forward will also get in the box when my left wing-back crosses to the far post from deep.
Summary
Enough about my tactic. Here’s some tips, summarised from this monologue:
- Plan your routes to goal. If you want your team to be more direct, maybe plan for one switch to release your main goal-scorer. The roles and instructions you pick should tie in with your intended build-up.
- If you have a midfield three, I’d recommend going with a sitter, a supporter and a shuttler, as I described.
- Try to start possession on the opposite side to the one you intend to overlap on. Also, achieve balance with your full-backs by allowing one to tuck inside, and cover when your team lose possession, and the other to swivel forward at will. I advise giving the former a defensive duty and the latter an attacking duty.
- Don’t expect every role to do what it says on the tin. Take the players starting position as the starting point, then conceptualise how the role affects the player in the context of your build-up.
- Be careful with your striker role, or alternatively your roles if you play with more than one of them. Some of them, such as false nines and trequartista’s, are primarily playmakers. Without the right support, though, teammates will still continuously play balls ahead of them, for the opposition centre-backs to lap up.
You haven’t said anything about team instructions?
Team instructions have knock-on effects that you often don’t realise until you pause the game. For instance, I play with one striker and my team focus play down the left. Off the ball, I often find my striker trying to find space down the left, to provide an out-ball option. Team instructions affect players’ positions, not just their decisions.
Allowing the team to play wider gives players with an inclination to hug the touchline, or shift themselves wider, that opportunity. For example, an inside forward in a wide team shape would operate differently from an inside forward in a narrow shape.
Overlapping and underlapping with wide players
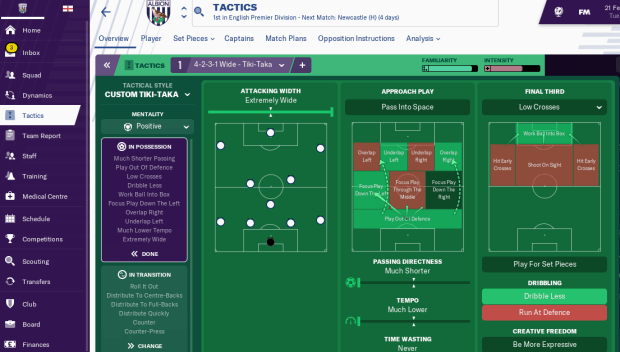
The overlap and underlap instructions should make sense. The overlap instruction encourages my right wing-back to bomb forward, and the rest of the team to keep the ball before seeking out the opportunity to swing it to their side. On the left side, our penetrating runs will be on the inside channel, predominantly through Calvert-Lewin.
Many of the instructions encourage more passes. I used to ask my players to dribble more, but now only my attacking wing-back, inside forward and false nine have that instruction. It would disrupt our ball circulation and cause us defensive problems after losing possession if we allowed everyone else to dribble at will.
Further down, telling the team to counter-attack doesn’t cause a particular conflict with ball circulation. Presenting it as a binary choice between ‘hold shape’ and ‘counter’ is misleading anyway. The urgency at which you counter depends on your instructions in possession and the players’ roles. From experience, ‘hold shape’ is never advisable unless you’re playing a cautious, defensive game because it tells your team to slow down and rest in possession when they win the ball back. That’s precisely the time when you ideally want them to take risks and exploit the spaces the opposition hand you on a plate!
Out of possession
I also abandoned the high line straight after writing about it! Well, not quite. I just figured aggressive pressing settings are an effective way to win the ball back high, without players constantly having to worry about what’s behind them. When your team press, the defensive line steps up anyway. Adjusting the line of engagement and defensive line just gives them something else to worry about.
So, copy these instructions or think of something better to suit your system. If you want a ball-hogging side that utilises these diagonal switches, similar instructions will probably be suitable.
Lastly, despite all this, other factors can make or break your side’s fortunes. Keep a close eye on your training schedule to develop, motivate and condition your players. Keep an even closer eye on set pieces to see if you’re making the most of them. Look at the difference these changes have made to my WBA’s side results, though:
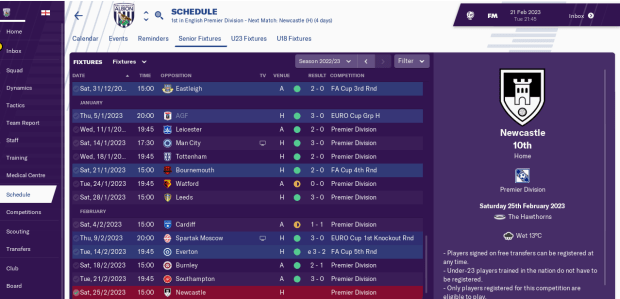
Onto England next!
If you ever have any questions about any of this, or anything you want to discuss, feel free to start the discussion below, or contact us on our social media channels!
Other Articles you may enjoy:
Decisions, Decisions, Decisions: FM Statistics Lab
Dictate the Game Podcast 11 | The FM Editor & DTG Cup
Dynamo Project: Introducing the Club DNA
Guide to the Wide Target Man and the Flo Pass Tactic