
5-3-2: The ultimate underdog formation?
I became intrigued with the 5-3-2 after watching the Prime documentary, Six Dreams, which led me to research more about the then-Girona Manager, Pablo Machin. He guided Girona to La Liga and narrowly missed out on the European places, using a 5-3-2 and 5-2-3. He then moved onto Sevilla and implemented a 5-3-2 which beat Real Madrid 3-0. Upon expanding my research I looked at Inzaghi’s 5-3-2 at Lazio, when he took to Inter. After reading numerous articles about both managers I was able to pick out elements from each manager which appealed to me.
Soon, I realised the 5-3-2 is a formation which suited me, and my managerial style, perfectly. After using it throughout my Girona save I transported it across to Germany when I started a career with Hamburg. During these combined 5 seasons I continually tweaked and developed my system. Sure, I occasionally tried other formation, but I always reverted back to the 5-3-2.
I feel its a misunderstood formation, but when done right, it’s one of the best there is.
In this article we’ll cover:
- Why choose a 5-3-2 in Football Manager?
- What are role values?
- Duties, not roles.
- Player requirements and set up options for defence, midfield and attack.
- 5-3-2 in action
- Results
- Is the 5-3-2 just an underdog tactic?
Why choose a 5-3-2 in Football Manager?
I feel that formations which employ three central defenders are unfairly brandished as “defensive” and negative. However, I feel it’s important to differentiate a compact and solid team from a defensive one.
With a 5-3-2 I have as many attacking players as more popular formations. When in possession, three centre backs cover the width of the pitch. This reduces the risk of being countered. Having a DM on defend allows the two central midfielders ahead of him to be more attack minded.
Essentially we can attack with 6 players: 2 wingbacks, 2 central midfielders, 2 attackers. The same as with popular “attacking” formations like a 4-2-3-1 and a 4-3-3. All whilst remaining defensively solid.
Not only is a 5-3-2 compact and tough to break down. It also allows us to attack in the coveted 3-2-5 or even a 3-1-6.
I also feel you can have success with less star players. Of course, this means you can put out a competitive team for less money. This brings us onto Role Values…
What are Role Values?
Roles values are my way of assessing roles within a team. This allows me to establish which of those are instrumental in making a formation a success. The flip-side of this is we can also see which roles are “budget” ones. Knowing this helps to know where to focus your spending. A budget role can easily be filled by free transfers, backups or decent youth players.
I could go on and one about role values for ages, but for now, you should get the gist. That’s probably another blog for the future.
Duties, not Roles
The purpose of this article is to give you a framework to be able to use the 5-3-2 formation with great success. It’s more of a philosophy and strategy, than set guidance. Therefore, whilst I’ll certainly suggest player roles I’ll also point out the duties they’re expected to carry out. This means you have a host of options in how to achieve this. Afterall, we all have favourite positions and different players at our disposal at any one time. There’s no square pegs in round holes. It’s up to you and your players who to choose to fill the roles.
GOALKEEPERS
Starting at the back, the ‘keeper is relatively easy to build a profile for in a 5-3-2. Obviously, you’ll want someone who is good at stopping shots, you won’t need me to tell you that!
As with all formations employing marauding wingbacks, this tactic has a weakness down the flanks. Whilst steps can be taken to combat this, there’s no sure-fire way to stop it entirely. You’re going to crosses into the box. Therefore, you’ll need a ‘keeper who can command the box and claim crosses.
Ideally your starter will be higher than the division average for goalkeepers. (Squad view > Analyst report > Comparison) in the following attributes:
- Aerial Reach
- Command of Area
- Bravery
I won’t recommend a role here as it entirely depends on who you have available. If you’re stuck with someone who isn’t comfortable on the ball, then don’t play a sweeper keeper. If you want a team who plays out of the back, then a sweeper keeper is the role for you.
The role value for a goalkeeper in a 5-3-2 is a minimum of amber. However, when it comes to goalkeepers it’s always important to get the best you can. They can be the difference between a relegation battle or a push for Europe.

CENTRAL DEFENDERS
As mentioned previously, with a 5-3-2 you’re likely to face quite a few crosses from wide areas. So it’ll come as no surprise that your three central defenders should be very good in the air.
It’s essential at least two of your three starters are at least the division average for defenders in:
- Heading
- Marking
- Jumping Reach
- Strength
In a four-man defence I’d want players well above the division average for their position. But, as we have three CBs instead of two, we don’t need to be so strict. We can also save some money in recruiting.
Centre backs meeting this criteria will be able to out-jump and out-muscle most opposition strikers. They’ll also deal with a lot of the crosses they’ll face. There’s more attributes it would be good to have at-least division average in.
- Aggression
- Bravery
- Positioning
Central Defender Duties
I’m going to give two options here, depending what situation you find yourself in.
It’s possible you’re at a poor team, defending deep like rabid dogs, or have little money to spend. Or both. In which case, you have my respect and pity. But don’t worry, in these situations you can use three “no-nonsense” CBs. All they need to do is get the ball away with head or feet. With a bit of luck they can pass a little and give the ball to midfielders or wingbacks. These players are the mostly the cheapest to find. Note – this style means you’ll likely need a big lump up front to win those inevitable long balls.
However, you might be lucky enough to have a few more options or money. If so, we can look to help the ball progression into phases by having either of the following role combinations:
- Destroyer, Destroyer, Ball Progressor.
- Destroyer, Ball Progressor, Ball Progressor.
The Destroyer, for me, is best placed in the centre of the three. The best player in the air, a strong tackler. Someone who does all the dirty work and who opposition strikers won’t be pleased about playing against. As they have a defensive midfielder in front of them and a CB at either side of them, they don’t need to be amazing passers. Just keep possession and head or kick the ball away. Simple.
Potential Destroyer roles:
- Centre Back- defend duty
- No-Nonsense Centre Back – defend duty
To take the 5-3-2 up a notch it’s important you have at least one central defender who can progress the ball. This ball progression can be done by passing or bringing the ball out of defence. As we have an extra defensive player we naturally have less forward players. This makes it easier for the opposition to mark everyone. The threat of a Ball Progressor who can make accurate passes into dangerous areas or bring the ball out of defence is vital in making opponents commit and therefore making it easier for forward players to get into space.
Potential Ball Progressor roles:
- Ball Playing Defender
- Wide Centre Back
I like to have one of each on either side.
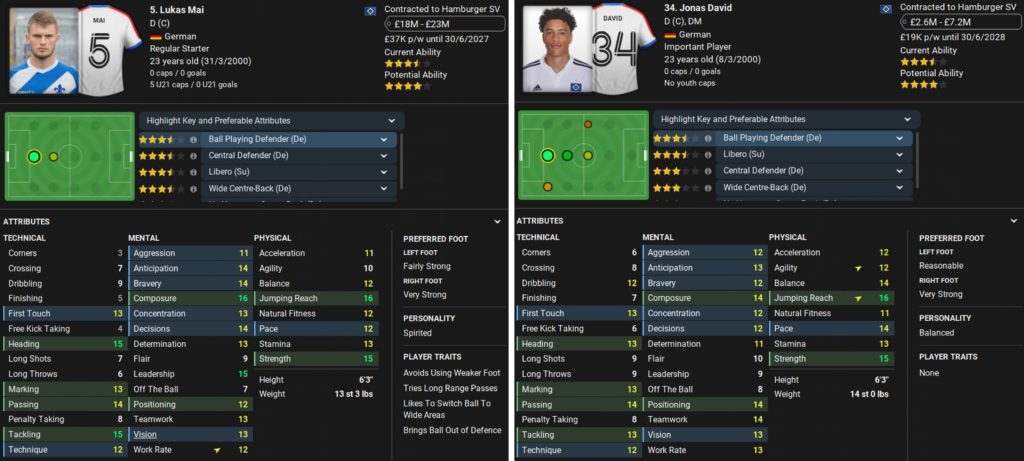
In my Hamburg save I have Lukas Mai (below) my Ball Playing Defender. Not only is he strong in the air, but he’s a very good passer with good vision and composure. Also, look at those traits. Perfect.
On the other side is Jonas David who is my Wide Centre Back (support). As you can see he’s very comfortable at passing and dribbling the ball. I’m trying to add the “brings ball out of defence” trait to him which will make him much more effective in this role.
Roles and values
As mentioned earlier, having the extra centre back lessens the physical requirements needed and therefore the required outlay of finding players who fit. Where prices start pushing up is when you start looking at CBs who also have higher than average pace and/or passing abilities. As we’re setting this up as an underdog tactic we’ll avoid those players and stick to what’s affordable for most teams.
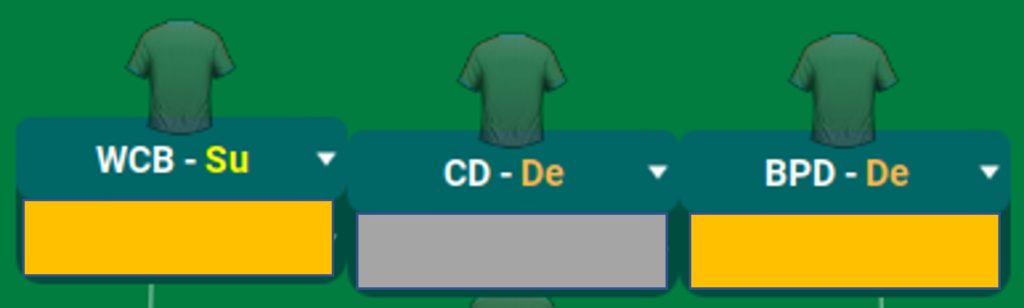
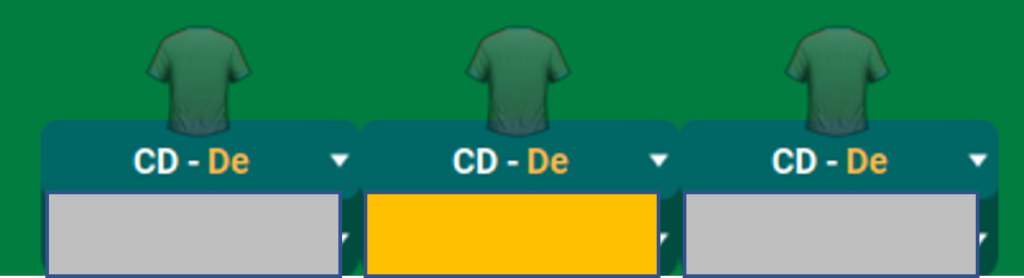
This set-up gives us a firm foundation at the back and with the two wide-roles we have a good balance in terms of how they can contribute to the attacking phase. I’ve chosen the WCB and BPD to be amber players as Ball Progressors. There is an element of extra skills needed (dribbling or passing as well as the required technical abilities), however neither need to be top players. As the requirements of the central CB – our Destroyer – are quite limited it should be easy to find a budget player who can hold down this position effectively.
Tip – If your stable of central defenders doesn’t contain someone who can bring the ball out of defence, don’t be afraid to adapt. At my very brief Rayo Vallecano spell I repurposed a DM to fill the role, who did the job very effectively.

If you’re REALLY struggling, however, you can use three Central Defenders on a defend duty. I’d make sure the central CB is the most skilled and has good pace as they may have to cover for less technically gifted teammates on either-side of them. Remember to click to make them “stay wider” so ensure they space out well to cover the wingbacks and to make it harder for the opposition to counter attack.
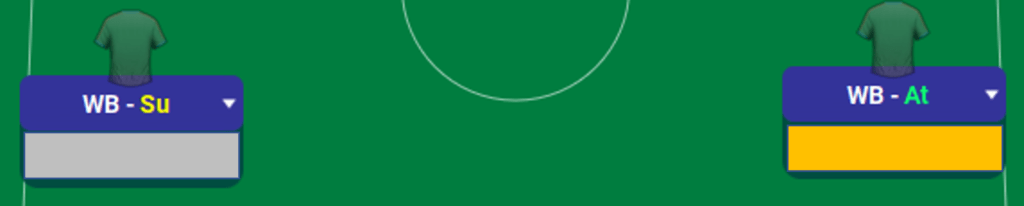
WINGBACKS
The work horses of the team. They need the engine to get up and down the pitch for 90 minutes. Here’s what they need to be able to do make this tactic a success:
- Provide width in every phase of play.
- Be comfortable enough on the ball to either help progress the ball downfield by dribbling or passing (I’ll come on to this shortly).
- Must be good at crossing.
Attribute-wise they don’t need to be the best defensively, due to the safety net of three CB’s and a DM. Therefore, you can look more towards attacking abilities rather than the defensive attributes you’d deem absolutely necessary for a Wingback in a 4-man defence. TIP – As a result of this you can easily retrain wingers to fill this role if needed, as long as their marking and tackling attributes are in the 7-10 region.
With this in mind, look for players who have above the division average for stamina, pace and work rate. Luckily, these aren’t highly skilled attributes so finding the right players should be friendly on your transfer budget.
When choosing players for these two roles I want each to be able to offer different threats to the opposition. Therefore, if one is much better at crossing than dribbling, I’ll ask him to cross more often, sometimes from deeper depending on the strikers at my disposal. And if one is very quick and a decent dribbler, I’ll get him to run with the ball more. If both play the same it adds an element of predictability to your attack.
Exactly how your wingbacks function will be down to your chosen style of play. If you’re blessed with nothing much more than speed and opt for a counter attacking system, then it’s good to prioritise dribbling. If you’re lucky enough to have a couple a central defenders and midfielders who are good passers, then you’ll require wingbacks who can help progress the ball downfield by making passing triangles. These triangles appear, and change, as the Wingback moves downfield. The first passing triangle available is with the near-side CB and CM, then changes into triangle 2 with the CM and the Forward. There’s an image of this down near the bottom of the page.
Roles and values
I like to have one wingback on support and one on attack. As more attacking attributes usually cost more, your attacking option should be at least an amber player. The other player, however, can be a budget option. As long as they have the engine and can either pass or cross at an average level they will be able to do a decent job.
MIDFIELD
Ahh, the midfield trio. The rise to prominence of the 4-3-3/4-1-2-2-1 means that most people should know how to forge a highly functioning midfield three.
However, for this system to work to it’s fullest we need to be a little different from a 4-3-3. Why? Because in a 4-3-3 you have three attacking players ahead of the midfielders. In this case we only have two, so its vital to get both central midfielders into advanced positions when possible.
When it comes to a three-man midfield I’m a firm believer that there’s three roles which need to be carried out effectively:
- The Aggressor– When you use a three-man midfield you’re generally looking to dominate (or at least compete) in central areas. You can’t do this effectively without stopping the opposition centrally. The Aggressor’s role is to win the ball back. Whether that’s through tackles, interceptions or relentless pressing causing disruption, it’s an essential role. The Aggressor can be used in either the CM or DM strata.
- The Creator – The heartbeat of the team. The Creator can be positioned in either the CM or DM slots and which one you choose will obviously effect how your midfield as a whole operates. As a defensive midfielder you’ll generally be looking at a Deep Lying Playmaker who’ll position himself in front of the back three and spray passes around whilst looking to play a killer ball to split the opposition. If used in the CM strata, the advanced playmaker will look to pick up the ball and drive the team forward by dribbling upfield or find space between the opposition midfield and defence and picking out attacking players in dangerous positions.
- The Line Breaker – What is a Line Breaker? Quite simply, it’s a midfield player, in the CM position, who causes havoc for the opposition by breaking through the line of midfield players to threaten their defence by pulling players out of position. It doesn’t matter if they have the ball at their feet or not. In fact, if they can do it without the ball it’s sometimes better because they’re more likely to be able to get into good positions, undetected. The important thing is they’re unsettling the opposition defence.
Here I’ve given two potential options of how you could set up a midfield to fulfil the three roles, depending on what players you have available. I’ve use both of these and both work well.
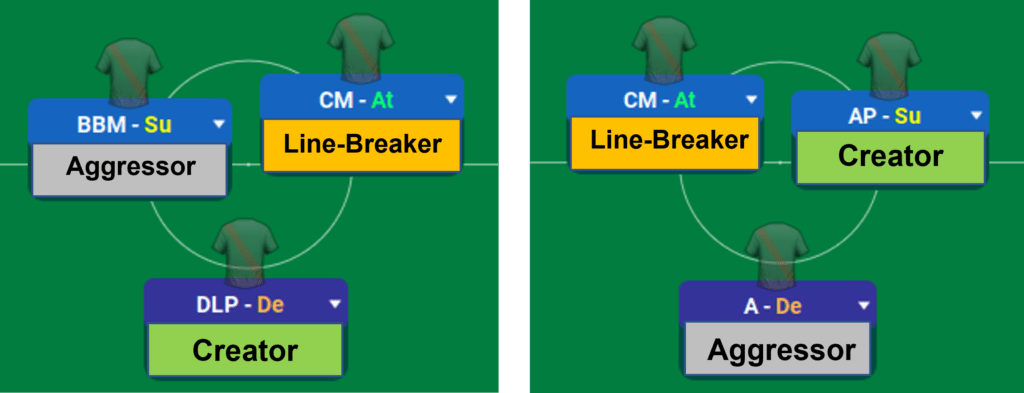
In the first example I’ve added the Aggressor into the CM positions as a Box to Box midfielder but you could easily use a Ball Winning Midfielder on support. I prefer the BBM as it’s generally more disciplined. In example two, I’ve used an Advanced Playmaker on support as the Creator in the CM slot. The support duty allows him to drop deeper and collect the ball. This gives him the option to dribble or pass as he gets the team moving upfield.
You’ll notice I’ve chosen a Central Midfielder on attack as the Line-Breaker in both options. You could choose a Box to Box midfielder or a CM on Support (if you ask him to get further forward when the team has possession). A Mezzala would also be a good option as they’ll get into good positions in the half-spaces (which is notoriously difficult to pick up).
Having the DM on a defend duty gives the green light to be more adventurous with your CMs and Wingbacks as you’ll still have four players back (including the centre backs) to deal with any opposition counter attacks.
If you’re wondering which of the two options to choose, consider this; If you’re play defensively and soaking up pressure, or regularly find your opponents dominating possession you should choose your Creator in the CM position. Why? Because the area just outside your penalty area, where a playmaker in the DM strata is positioned will very likely be crowded and they’ll have very little space to work in.
An Advanced Playmaker in the CM slot is likely to be able to find much more space and will be able to carry the ball forward and kick-start a counter attack.
Role Values
Starting with the highest, the Creator, should be one of the key players in your team and where you should throw a good amount of money at when possible. Next is the Line-Breaker, they’ll need the anticipation to move into those dangerous areas and the composure and technical abilities to be a scoring threat or make the assist.
The Ball-winner should be relatively easy to find (and replace). Someone with a good engine and good defensive instincts to win the ball by whatever means necessary. Using this system with Girona I was able to find two players to fill this role, both of which cost under £250k.
STRIKERS
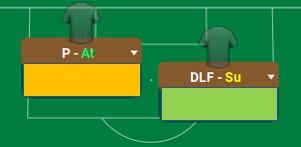
Here we’re doing nothing out of the ordinary. Our two-man attack will consist of:
- A Scorer
- A Deep Forward
The Scorer’s role is to sit on the shoulder of the defenders, pushing the defence as close to their goal as possible whilst being ready to pounce on any opportunity which arises. I like to use a Poacher. Whilst people generally like to have their Poachers be very quick and agile, I prefer to use someone who’s physical profile is leaning more towards that of a Target Forward. By that, I’m not saying they need to be 6’3″ with 15 heading and strength… but someone who can hold their own against CBs, physically, and can score with their head is a very good option here. Afterall, we have two wingbacks who’ll be whipping in crosses all game… someone’s got to be there to take advantage and claim the glory. If you have no one in that style, an Advanced Forward could be a good option.
For the Deep Forward you have some flexibility, depending on what players you have at your disposal. I’ve had success with a Deep Lying Forward (support), False 9 and a Complete Forward (support). I’ve used Dragan Stoisavljevic as a DLF and Sonny Kittel as a False 9 at Hamburg and Sergi Guardiola as a CF(S) at Rayo Vallecano. All could pass reasonably and have decent vision but all had different physical profiles. I like DLF’s to be stronger and False 9s to be quicker and more agile.
The main thing is that they drop off and either fill the space between the opponents defence and midfield when both your CMs are pushed back, or help create overloads in that area with one or more of your CMs when in possession.
Ideally, we’re looking for both strikers to stay relatively close together and form a nice relationship.
TIP – playing the Line Breaker behind the Deep Forward can create some nice swapping of positions and cause problems for defenders.
Role Values
When it comes to strikers, it’s not a position to scrimp and save at. You need the best possible players that you can get your hands on. Your Scorer should be one of your marquee players. Your Deep Forward, however, can be in the “amber gang” as they aren’t required to be out and out scorers which can generally cost you a little less.
THE 5-3-2 FORMATION
Putting all that together, here’s what I used for my real underdog campaigns with Girona and Hamburg:

As mentioned earlier, the Deep Forward (DLF-S) drops deep and drags defenders with him which creates room for the Line-Breaker (CM-A) to exploit. On the other side, the advanced positioning of the Scorer (Poacher) creates room for the Destroyer (B2B) to step into.
SPEED KILLS (OPPOSITION DEFENCES)
Having fast players in this system can be the difference between good and excellent. I look to have players with above average pace in both wingback positions, the Line-Breaker and one of the two striker roles. This really helps the team break with pace and having speed out wide and through the centre can be deadly.
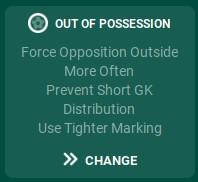
5-3-2 TEAM INSTRUCTIONS
How you want the team to actually play is entirely up to you, the players are your disposal and your own philosophy. I’m more conservative and prefer a defence-first approach so I tend to use standard passing to allow quick counter attacks when available. This worked fine with Girona and Hamburg, but with Rayo Vallecano the midfield struggled to maintain possession and looked a whole different team when I switch to shorter passing.
Usually, I start games with a balanced mentality and adjust as and when is needed. I like to play out of defence as this usually draws the opposition in, creating space for our quicker wide or attacking players.
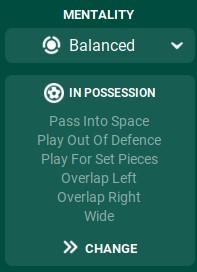
When it comes to transitional play I ask the ‘keeper to distribute quickly to attempt to catch the opposition out of their defensive set up when we have the opportunity to counter.
Those two are always selected but whether we Counter-Press or Regroup depends on the opposition. Against much stronger opponents I always Regroup as having a packed middle makes us very hard to beat.
When we’re not in possession I always have Force Opposition Outside selected. With our glaring weakness being down the flanks, this may seem a strange strategy. However, our compact centre, combined with opposition instructions to press opposition wide players (fullbacks, wingbacks, wingers) makes it very hard for them. Once they’re being pressured with the touchline on one side of them and lots of our players in the centre of the park it can be difficult find an passing option.
When using a 5-3-2 I like to stick with a medium block by using standard lines. Defensively, we don’t want to sit back any deeper than standard. In attack we want space for our attacking players to run into so a standard Line of Engagement works well. TIP – When playing much stronger teams you can drop the LOE to “lower” to make the centre of the pitch extra-compact.
THE 5-3-2 IN ACTION
Here I wanted to show some images I’ve collated throughout my time with the 5-3-2, allowing you to see how it’s set up and any intricacies I can point out.
The first image shows Girona in their defensive set up, transitioning into attack. You can see how much we immediately stretch the field. Whilst not short of passing options, if Bueno plays a quick pass to the left wingback, hugging the touchline near half way, we’ll have a 2v1 against the defender currently marking our left-sided striker. This image shows how compact out midfield trio stay.

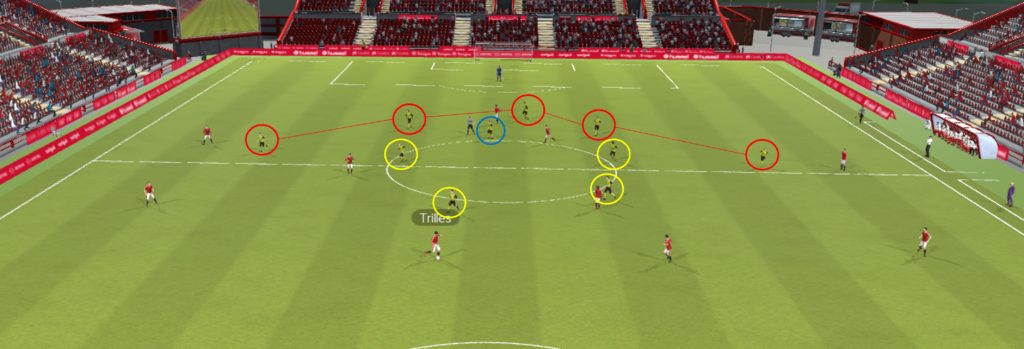
Below you can see one of the reasons I love using an Anchor when my Creator is in the CM strata. Here, the Ball Playing Defender (the Progressor) bought the ball out of defence. Seeing this, diminutive Gonzalez, our Anchor (Aggressor) dropped into the back three. Not only is he providing cover but he also make himself available for a pass.
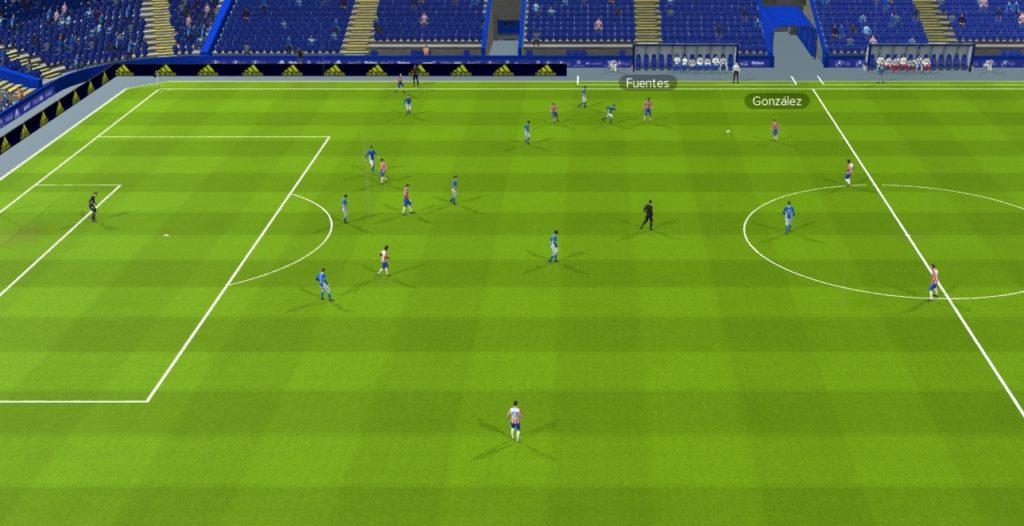
Image three, shows us in the defensive set up when the opposition centre back has the ball. You can see how well we cover the pitch compact the centre is. Our four “advanced” players in yellow form a square to block off the middle. The DM covers any passing options to their AMC and is an extra deterrent against long balls.
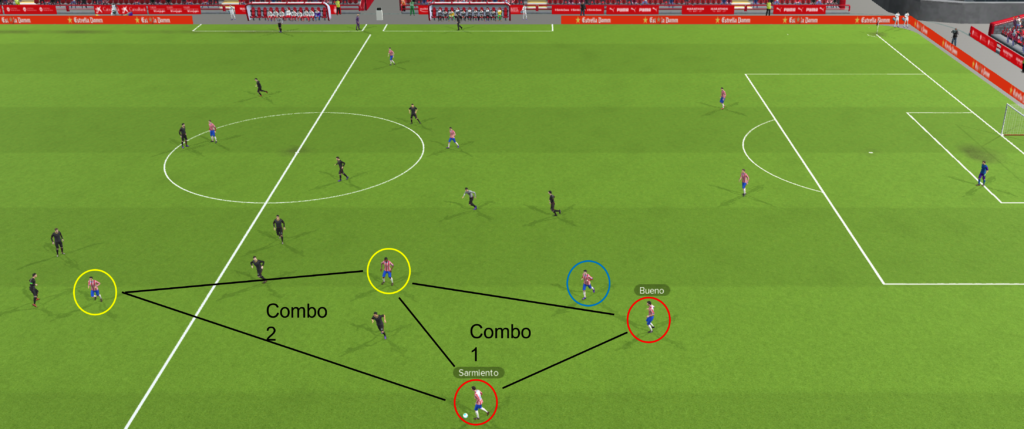
In the penultimate image we see one of the nice elements the Wingbacks bring to the team in a 5-3-2. As discussed in the Wingbacks section, one of their main jobs is to provide width and help progress the ball downfield in every phase by linking nicely with Centre Backs, Midfielders and Attackers. You can see the passing triangles which become available to our Wingback. Here, Dario Sarmiento (a winger deployed as a wingback due to injury) has four easy passes he can make to keep the ball moving. TIP – a Wingback on an attack duty may be too advanced to have these passing triangles available.
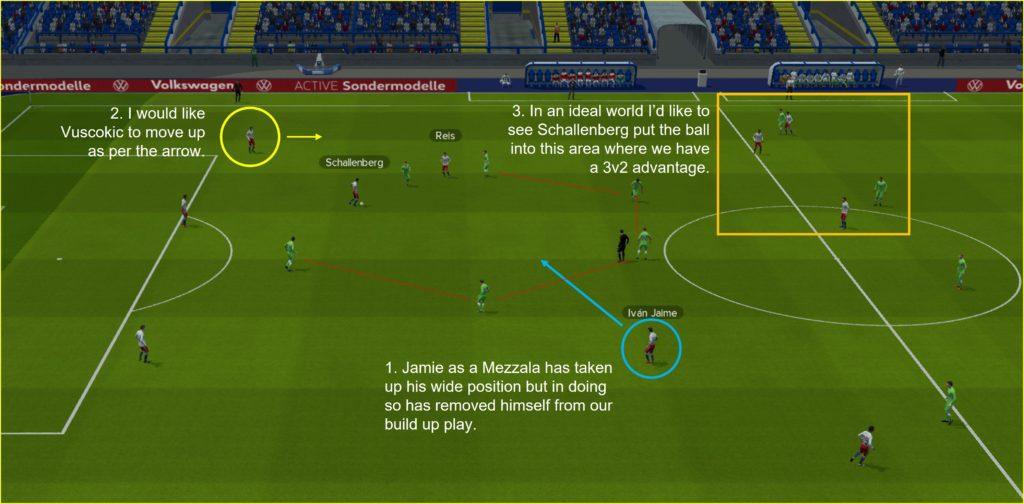
This final image shows a couple of observation. Using a 5-3-2, made from a Hamburg game versus a very well organised Wolfsburg. In this image our Creator, Ron Schallenberg, operating as a DLP has the ball and has no immediate passing options. The image shows highlights how a Mezzala (1) has moved into his wider space. However, in doing so taken himself out of the build-up phase. This happened regularly so I reverted his role back to a CM-A. It also prompted me to alter my Wide Centre Back (Vuskovic) from a defend duty to support. What I really like is the man advantage we have on the left wing. This is similar to in the first image of this section.
RESULTS WITH THE 5-3-2
Of course, I wouldn’t be endorsing this formation and philosophy if I hadn’t found success with it. Nor would I be claiming its the best underdog tactic, especially for those on a budget.
With Girona I won promotion to La Liga in season 1 and narrowly missed out on European Qualification in season. Season 3 saw us finish in 6th place, with a +24 goal difference and one of the best defences in the league. This was achieved with the 3rd lowest wage budget in La Liga.
With Hamburg we won promotion to the Bundesliga in season 1 and in season 2 we finished in 8th, one place outside European Qualification. Again, with one of the lowest budgets in the the division.
As part of an experiment to turn round a struggling team with this system, I took over Rayo Vallecano who were rooted well in the relegation zone. Unfortunately, this save file corrupted, but after a couple of rocky games they adapted to the 5-3-2 and we went on a run and moved out the relegation zone.
IS THE 5-3-2 JUST AN UNDERDOG FORMATION?
No, the 5-3-2 certainly is not just an underdog formation. It’s one you can use throughout a while management career as your team evolves. When your team becomes more successful and you find your challenge is no longer keeping stronger opponents at bay, but instead you being the team having to break down low blocks. Your Creator as a DLP (DM) will sit in the middle of the park and recycle possession whilst trying to find that perfect pass. Your pressing will force the opposition defence into long balls forward which one of your three CBs will comfortably win and the cycle starts again.
Is the 5-3-2 the ULTIMATE underdog formation? It just might be. It’s one hell of a tactic. Give the 5-3-2 a try.
9 thoughts on “5-3-2: The ultimate underdog formation?”
hola..👍
download tactic ???
Hola – haven’t got a download, but it should be easy to create for your team. Thanks for reading.
Hi, the role values of your striker roles change between the chapter on strikers and the full formation. Which one do you see as the more important role to fill with value?
Hi, thanks for the question, and for reading. To be honest, it’s not really about the role specifically. It’s more about them remaining high and pushing the opposition central defenders back, which in turn creates room for your deep forward and any runners for midfield. So, as long as they fulfil that duty their role can depend on what players you have available. I’ve used Nils Petersen as a great poacher. In his 30’s, not very mobile but a deadly finisher. Kevin Schade has done well as a poacher but kicked on to another level since I changed him to an inside forward as he’s quicker and I wanted him running the channels more. Hope this helps.
This is a superb article, which gave me plenty to think about… rather than just download and disengage the brain.
Really well written. Congratulations.
Crazy, I just developed this tactic on my own, some hours ago on my Blackburn save. Then, I decided to google “532 FM”, and found this which is exactly what I just did. It’s only been 4 matches but I have seen a huge improvement from last season (finished 11th, after finishing 3rd the season before). The main differences I see is that you overlap and play wide, while I play fairly narrow. I had to play with more discipline to avoid my midfielders kicking it long into the box every time. I’m still developing the tactic, but I’ve got a good foundation. Restricted a top side like Burnley to only 0.29 xG (minus the penalty)
I’ve been thinking of switching to a 5-3-2 for a while now from 4-1-2-3 and this article has convinced me to do it!
I’ve been doing really well with US Concarneau in the French National but I’m taking over Darmstadt in 2.Bundesliga at the end of the season so will give the 5-3-2 a go there.
Brilliant article with loads of depth.
Cheers
This is a fantastic guide – I’m just curious as to which tactical style you used as a basis? Am I best to use a counter-attack style or control possession, or stick to a defensive style?